After going through the fundamentals of MERN stack are you ready for the next piece? Let’s get into building a simple MERN based application. This hands-on will help you understand how these technologies work together to create a fully functional application.
Let’s start with its Anatomy
MERN (MongoDB, Express.js, React, Node.js) is a powerful technology stack that covers both frontend and backend needs, making it ideal for full-stack developers looking to build dynamic and scalable application.
In this blog, we’ll walk through developing a full-stack web application for User Management Systems using the MERN stack. We’ll cover each step, from setting up the backend to building an interactive frontend, ensuring you have a comprehensive understanding of the entire development process.
Backend Folder Structure
└── Your_ParentDirectory/
    ├── Backend/
    │    ├── config
    │        ├── database.js
    │        └── ...
    │    ├── controller
    │        ├── userController.js
    │    ├── model
    │        ├── userModel.js
    │        └── ...
    │    ├── route
    │        ├── userRoute.js
    │        └── ...
    │    ├── index.js
    └── Frontend
Prerequisites for Starting a MERN Project
Before you dive into building a MERN application, make sure you have the following tools installed and set up correctly. This will help you avoid compatibility issues and get started smoothly.
Node.js
Node.js is essential for running server-side JavaScript and setting up your backend as we got to know Discovering the MERN Stack... blog.
Minimum Version: Node.js v14.x
Recommended Version: Node.js v16.x or later for optimal performance and support.
To check if Node.js is installed and to see your version, run:
node -vIf Node.js isn’t installed, download and install it from the Node.js website
npm (Node Package Manager)
npm, which comes with Node.js, is needed to manage packages and dependencies in your project.
Minimum Version: npm v6.x
Recommended Version: npm 8.x or later
To verify your npm installation and version, use:
npm -vIf you need to update npm to the latest version, run:
npm install -g npmMongoDB
We also learned about MongoDB in last MERN blog (Discovering the MERN Stack...), which is the database where you’ll store and retrieve your application data.
Minimum Version: MongoDB v4.x or later
MongoDB Compass
To work with MongoDB, you can use either the CLI or a GUI. In this project, we’re using the GUI tool MongoDB Compass for managing a local database.
To set up MongoDB locally, download it from the MongoDB installation page and follow the instructions for your operating system. Alternatively, use MongoDB Atlas for a managed cloud database.
Visual Studio Code (VS Code)
VS Code is a popular code editor with powerful extensions and tools for JavaScript development. You can download VS Code from its official website.
With these installed, you’re ready to start building your MERN application!
Building the Backend with Node and Express
In this section, we’ll set up the backend of our User Management System using Node.js and Express to handle data flow, user authentication, and API endpoints by following these steps:
Getting Started: Prerequisites and Setup
Installing Libraries & Packages
Setting Up the Backend with Express and Node.js
Express Server Configuration
Step 1: Getting Started: Prerequisites and Setup
First, create the project directory and set up the backend structure.
Open the Command Prompt (CMD) and run the following commands:
Copymd my-mern-app code my-mern-appOnce the folder opens in VS Code, launch a new terminal and execute:
Copycd my-mern-app md backend cd backend npm init -y
This creates a package.json file, which will manage your project's dependencies.
npm init -ycommand sets up the project without asking questions. If you prefer to customize your project details, you can simply runnpm initinstead.
Step 2: Installing Libraries & Packages
Next, install the essential packages for your backend. Run the following command in the terminal within your project directory.
npm install bcryptjs cors dotenv express jsonwebtoken mongooseexpress: In our last blog (Discovering the MERN Stack…), we learnt what express is.
mongoose: MongoDB ODM (Object Data Modeling) library for schema-based data modeling.
dotenv: Loads environment variables from a
.envfile.cors: Middleware to enable Cross-Origin Resource Sharing, allowing resource access across different domains.
bcryptjs: Library for hashing passwords and securing sensitive data using the bcrypt algorithm.
jsonwebtoken: Provides a set of methods for creating, signing, and verifying JWTs (JSON Web Tokens).
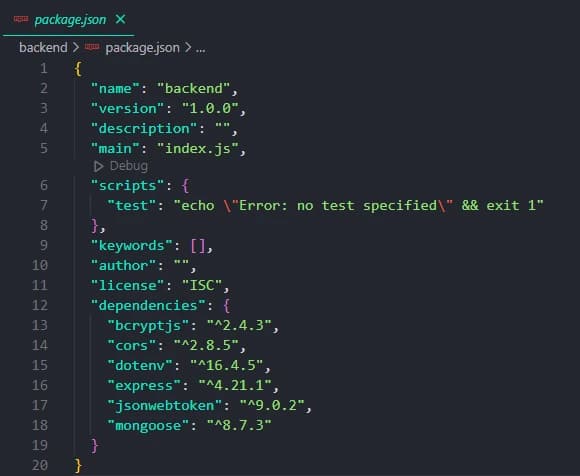
Your package.json should now look something like this:

package.json file within backend folder - Techieonix
Step 3: Setting Up the Backend with Express and Node.js
Writing code in a single file can lead to a hard-to-maintain mess. To create a clean and maintainable structure, we'll implement the MVC (Model-View-Controller) architecture. This separates the application logic, making it easier to manage and scale.
Setting Environment Variables
Let’s start by setting up environment variables to use across the project for securely managing sensitive information like database credentials and other configuration settings.
Create a .env file in backend directory for environment variables
Write all the environment variables used across the application.
# /backend/.env
MONGO_URL = mongodb://127.0.0.1:27017/userManagementSystem
PORT = 5000
SECRET_KEY = ThisIsASecretKeyForUserManagementSystem
Here’s a breakdown of each variable:
Replace
MONGO_URL: Use your actual MongoDB connection string, which you can find in your MongoDB Atlas dashboard or from your local MongoDB (Compass) setup (for example.,mongodb://localhost:27017/your_database_name).Set the
PORT: Specify the desired & available port for your application to run your backend on.Configure
SECRET_KEY: Set a secure, random string for signing JWTs to ensure authentication security.
Make sure to replace MONGO_URL with your actual MongoDB connection string, your desired and available PORT and SECRET_KEY with a secure key for signing tokens.
Database Configuration
Once we’ve declared the environment variables, the next task is to connect the application to the database. This involves setting up a connection string to link your backend to MongoDB.
Create a config folder in backend directory.
Create a file (for example:
dbConnection.js) to handle the database connection.
/* /backend/config/dbConnection.js */
const mongoose = require('mongoose');
exports.connect = () => {
    mongoose.connect(process.env.MONGO_URL || [yourConnectionString]).then(() => {
        console.log('DB CONNECTED SUCCESSFULLY');
    }).catch(err => {
        console.log('DB CONNECTION FAILED');
        console.error(err);
        process.exit(1);
    });
}
The connect method establishes a connection between MongoDB and the application using Mongoose, logging a success message or an error message if the connection fails.
Data modeling
Define the structure of your data model for users:
Create a folder named model within backend directory.
Create a file (for example:
userModel.js) defining the user schema.
/* /backend/model/userModel.js */
const { Schema, model } = require('mongoose');
const userSchema = new Schema({
    name: {
        type: String,
        required: [true, 'Please provide your name']
    },
    email: {
        type: String,
        required: [true, 'Please provide your email']
    },
    password: {
        type: String,
        required: [true, 'Please enter password'],
        select: false
    },
    role: {
        type: String,
        required: [true, 'Please select user role'],
        enum: ['Admin', 'Manager', 'User']
    },
    token: String,
    dob: String,
    phone: String,
    address: String
});
module.exports = model('User', userSchema);
Define a Mongoose schema for Users in Mongo database, including fields for name, email, password, role, token, dob, phone, and address. The following are the required fields:
nameemailpassword(select: falsewill hide the password as default when we fetch the user)role(limited to specific values: "Admin", "Manager", or "User")
After defining the schema, export the model to make it accessible in other parts of the application, such as the controllers.
API Logic
With the user model in place, the next step is to implement the controllers that will handle the API endpoints for CRUD (Create, Read, Update, Delete) operations. Start by creating a controllers folder in the backend directory.
Auth Controller
Create a file (for example:
authController.js) for login logic:
/* /backend/controllers/authController.js */
const User = require('../model/userModel');
const bcrypt = require('bcryptjs');
const jwt = require('jsonwebtoken');
const login = async (req, res) => {
    try {
        const { email, password } = req.body;
        if (!(email && password)) {
            return res.status(400).send('Email or password not provided!');
        }

        const user = await User.findOne({ email }).select('+password');
        if (!user) {
            return res.status(404).send('Email not found');
        }

        const passwordMatch = await bcrypt.compare(password, user.password);
        if (!passwordMatch) {
            return res.status(401).send('Invalid password');
        }

        const jwtToken = jwt.sign(
            { id: user._id, email: user.email, role: user.role },
            process.env.SECRET_KEY,
            { expiresIn: '10d' }
        );
        user.token = jwtToken;
        await user.save();

        return res.status(200).send({
            message: 'Login successful',
            token: jwtToken,
            user: {
                id: user._id,
                email: user.email,
                role: user.role
            }
        });
    } catch (error) {
        console.error(error);
        return res.status(500).send('Internal Server Error');
    }
}
module.exports = { login };
This function manages user authentication by verifying credentials and generating a JWT token. The select("+password") part indicates that password is needed when fetched.
The function then responds with success, or appropriate error messages for any failures. Finally, it's exported in other parts of the application (e.g., routing).
User Controller
Create a file in controllers folder (for example:
userController.js) for performing CRUD operations on user.Write functions that implements the crud operation on user module.
Add User
/* /backend/controllers/userController.js */
const addUser = async (req, res) => {
    try {
        const existingEmail = await User.findOne({ email: req.body.email });
        if (existingEmail) {
            return res.status(409).send('Email is already in use');
        }

        const saltRounds = 10;
        const encryptedPassword = await bcrypt.hash(req.body.password, saltRounds);

        const user = await User.create({ ...req.body, password: encryptedPassword });
        return res.status(200).json({
            message: 'User added successfully',
            user: {
                id: user._id,
                email: user.email,
                role: user.role
            }
        });
    } catch (error) {
        console.error(error);
        return res.status(500).send('Internal Server Error');
    }
}
addUser function that handles user creation which checks if a user with the provided email already exists in the database. If the email is unique, it hashes the user's password, creates a new user record in the database, and responds with a success message.
Fetch All Users
/* /backend/controllers/userController.js */
const getUsers = async (req, res) => {
    try {
        const users = await User.find({});
        if (users.length == 0) {
            return res.status(404).send('Users not found');
        }
        return res.status(200).json({
            message: 'Users fetched successfully',
            users
        });
    } catch (error) {
        console.error(error);
        return res.status(500).send(error.message || 'Internal Server Error');
    }
}
Define getUsers function that retrieves all users from the database. If no users are found, it responds with a message indicating that users were not found. If users are successfully fetched, it returns the users' data.
Fetch Single User By ID
npx create-react-app frontend   # Creates react application
cd frontend
npm i
npm start
This getUserById function is retrieving a user by their ID from the request parameters. If the user is found, it responds with a 200 status and the user data, if not found, it returns a "User not found" message.
Delete User
/* /backend/controllers/userController.js */
const deleteUser = async (req, res) => {
    try {
        const id = req.params.id;
        const user = await User.findById(id);
        if (!user) {
            return res.status(404).send('User not found at given id');
        }
        await user.deleteOne();
        return res.status(200).json({
            message: 'User deleted successfully',
            user
        });
    } catch (error) {
        console.error(error);
        return res.status(500).json('Internal Server Error');
    }
}
The deleteUser function handles the deletion of a user by the user ID. It then searches the user in the database. If it's not found, it returns an error message. Otherwise, it deletes the user with returns a success message.
Update User
/* /backend/controllers/userController.js */
const updateUser = async (req, res) => {
    try {
        const id = req.params.id;
        let user = await User.findById(id);
        if (!user) {
            return res.status(404).send('User not found');
        }

        const existingEmail = await User.findOne({ email: req.body.email });
        if (existingEmail) {
            return res.status(409).send('Email is already in use');
        }

        await user.updateOne(req.body, { new: true });
        res.status(200).send('User updated successfully');
    } catch (error) {
        console.error(error);
        return res.status(500).send('Internal Server Error');
    }
}
Implementing an asynchronous function updateUser that updates a user's details. If the user is not found, it responds with an error message. It’s also making sure that the email is unique. Upon successful update, it updates and returns a success message.
Each function (
addUser,getUsers,getUserById,deleteUser,updateUser) includes error handling with appropriate status codes and messages to manage exceptions during database operations.
Finally, export all of these above written functions
module.exports = { addUser, getUsers, deleteUser, updateUser, getUserById };With the core API logic set up in the controllers, the next step is to secure these routes with middleware for authenticated users.
Middleware
Create a middleware folder in backend directory.
Create a file in this folder (for example:
auth.js) for protecting routes.
/* /backend/middleware/auth.js */
const jwt = require('jsonwebtoken');
const authorizeRoles = (...allowedRoles) => {
    return (req, res, next) => {
        try {
            const token = req.headers.authorization.split(' ')[1];
            if (!token || token === 'null') {
                return res.status(401).send('Authentication failed: No token provided');
            }

            const decodedToken = jwt.verify(token, process.env.SECRET_KEY);
            if (!allowedRoles.includes(decodedToken.role)) {
                return res.status(403).json({ role: decodedToken.role, message: 'Authorization failed: Access denied' });
            }
            req.user = decodedToken;
            next();
        } catch (error) {
            console.error('Authorization error:', error);
            return res.status(401).send('Authentication failed: Invalid token');
        }
    }
}
module.exports = { authorizeRoles };
This middleware function checks if the user has the required roles to access certain routes.
The select("+password") middleware restricts access based on user roles by verifying the JWT token from the Authorization header. It returns a status (401 or 403) and an error message if authentication fails; otherwise, it is exported for protected routes.
API Routes
With the controllers are handled and the middleware is set up, the next step is to define and organize routes for each API endpoint.
Create a route folder in backend directory.
Create a file in this folder (for example:
userRoutes.js) for user-related routes.
/* /backend/route/userRoutes.js */
const express = require('express');
const { authorizeRoles } = require('../middleware/auth');
const { addUser, getUsers, getUserById, deleteUser, updateUser } = require('../controller/userController');
const { login } = require('../controller/authController');
const router = express.Router();

router.post('/login', login);

router.post('/users', authorizeRoles('Admin'), addUser);
router.get('/users', authorizeRoles('Admin', 'Manager'), getUsers);
router.get('/users/:id', authorizeRoles('Admin', 'Manager'), getUserById);
router.delete('/users/:id', authorizeRoles('Admin'), deleteUser);
router.put('/users/:id', authorizeRoles('Admin'), updateUser);

module.exports = router;
This code sets up an Express router (express.Router()) for handling user-related routes. It uses authorizeRoles middleware to control access based on roles in most of the functions from controllers. Following are the APIs endpoints and its function:
POST /login: CallsloginfromauthControllerfor user login.POST /users: CallsaddUserfromuserControllerto create a new user only if the user is an "Admin".GET /users: CallsgetUsersfromuserControllerto fetch a list of users only if the user is "Admin" or "Manager".GET /users/:id: CallsgetUserByIdfromuserControllerto get a specific user by ID if the user is "Admin" or "Manager".DELETE /users/:id: CallsdeleteUserfromuserControllerto delete a user by ID only if the user is "Admin".PUT /users/:id: CallsupdateUserfromuserControllerto update a user by ID only if the user is "Admin".
Finally, these routes are exported to be used in the main application file (for example: app.js).
Adding Default Admin User in the Database
To create an initial admin user when your application starts, add a function that creates an admin user.
Create a util folder in backend directory.
Create a file in this folder (for example:
seed.js) to write logic for adding the user.
/* /backend/util/seed.js */
require('../config/database').connect();
const User = require('../model/userModel');
const bcrypt = require('bcryptjs');
const jwt = require('jsonwebtoken');
const addUser = async (name, email, password, role) => {
    try {
        const existingEmail = await User.findOne({ email });
        if (existingEmail) {
            console.log({
                status: 409,
                message: 'Email already exists'
            })
            process.exit(1);
        }
        const saltRounds = 10;
        const encryptedPassword = await bcrypt.hash(password, saltRounds);
        const user = await User.create({ name, email, password: encryptedPassword, role });
        console.log({
            status: 200,
            message: 'User added successfully',
            user: {
                id: user._id,
                email: user.email,
                role: user.role
            }
        })
        process.exit(0);
    } catch (error) {
        console.error(error);
        console.log({
            status: 500,
            message: 'Internal Server Error'
        })
        process.exit(1);
    }
}

addUser('Test', 'test@gmail.com', 'abc123', 'Admin');
This script connects to the database, checks email’s uniqueness, hashes the password, and creates the user. It saves the user to the database. If successful, it logs a success message with user info and token, otherwise it logs an error and exits. The function is called with sample data to add a default admin user:
Step 4: Express Server Configuration
Now set up the Express server in the server.js file to get your backend server running. This will handle all incoming requests, connect to your database, and route them to the appropriate controllers.
Create a file in this folder (for example:
server.js) in backend directory.
/* /backend/server.js */
require('dotenv').config();
require('./config/database').connect();
const express = require('express');
const cors = require('cors');
const userRoutes = require('./route/userRoutes');

const app = express();

app.use(express.json());
app.use(cors());
app.use('/api', userRoutes);

app.listen(process.env.PORT, () => console.log(`Server is Listening on ${PORT}`));
This code initializes an Express server that loads environment variables from a .env file, connects to the database, and applies middleware:
app.use(express.json()): Enables JSON parsing for requests.app.use(cors()): Allows Cross-Origin Resource Sharing.
User routes are mounted under /api (customizable endpoint). Finally, the server starts on the specified port (defaulting to 5000 which is changeable) with a confirmation log.
Putting it All Together
Now, let’s bring everything together by running the API we have set up so far. Execute the following command to run the Express server:
cd backend
node server.js
Create An Admin User
First create an admin user who can manage other users by executing the utility script.
Open a new terminal window in the root project directory and run the following command to navigate to the util folder in the backend directory:
cd backend/utilOpen the
seed.jsfile in your code editor and adjust the function call within it to set the desired credentials for the admin user (e.g.,email,password).
Add default admin user - Techieonix
Execute the Script
Copy└── ParentDirectory/ ├── frontend/ │ ├── public │ ├── favicon.ico │ ├── index.html │ ├── logo192.png │ ├── logo512.png │ ├── manifest.json │ └── robots.txt │ ├── src │ ├── userController.js │ ├── App.css │ ├── App.js │ ├── App.test.js │ ├── index.css │ ├── index.js │ ├── logo.svg │ ├── reportWebVitals.js │ └── setupTests.js │ ├── .gitignore │ ├── package-lock.json │ ├── package.json │ └── README.md └── backend
Login with the admin user
After creating the user login with the admin user.
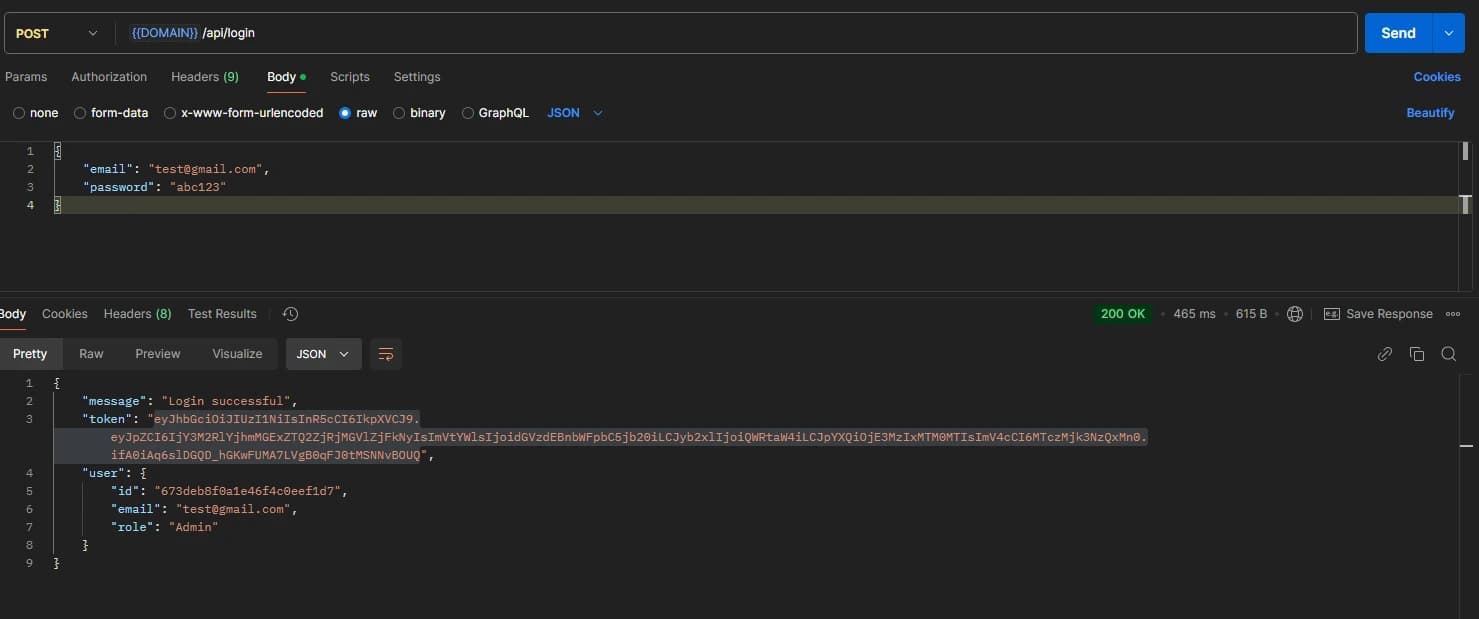
Open postman and create a new request
Select the request type to POST and enter the API url (
http://localhost:5000/api/login)Select Body > raw > JSON
Enter
emailandpasswordas payload and submit the requestCopy this given confidential token and save it

Login using Postman - Techieonix
Creating a new User
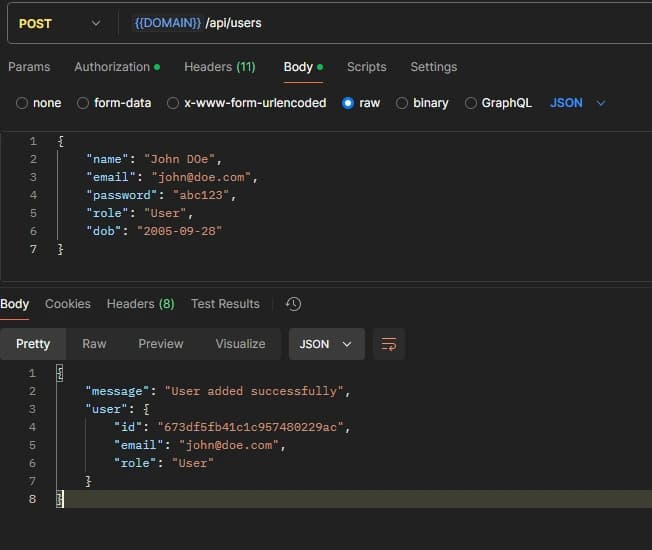
Since you've logged in as an admin user, you can call an API. Let's create a new user by calling the POST /api/users.
Create a new request
Select the request type to POST and enter the API url (
http://localhost:5000/api/users)In Authorization section, select Auth Type as Bearer Token and paste token you copied
Select Body > raw > JSON
Write the payload with your desired details and hit Send button

Adding user using Postman - Techieonix
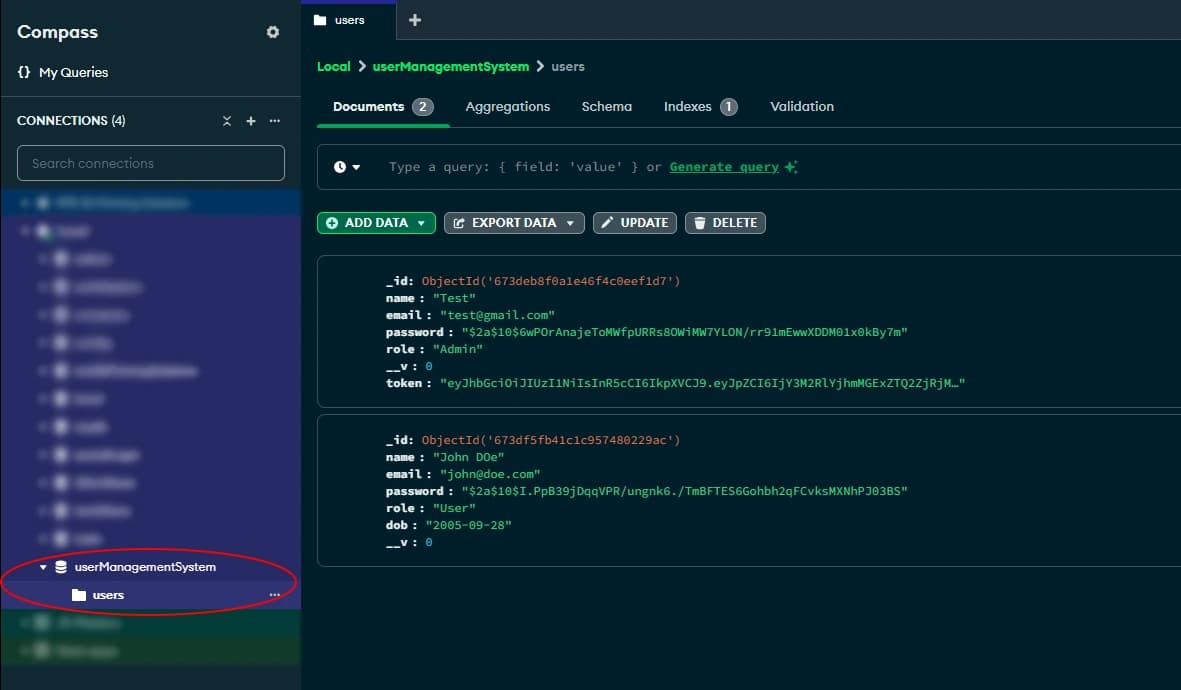
The below given response confirms that the user has added successfully to the database. You can then check MongoDB to verify that the user appears in the users collection.

Users schema in MongoDB Compass - Techieonix
Ready to build a scalable and efficient backend for your next project?
At Techieonix, we specialize in creating robust backend systems, seamless API integrations, and scalable full-stack solutions using the MERN stack. Whether you’re starting from scratch or looking to enhance your existing system, we can help you bring your vision to life.
Let’s make it happen! Get in touch with us today to discuss how we can turn your ideas into reality.
Let’s DiscussLet's Conclude
🎉 After setting up all the routes, controllers, and models, you’ve successfully completed the backend part of your project! Well done — you’ve laid the foundation for your application’s functionality and ensured that your data flows seamlessly through the server.
We will soon publish a new blog to guide you in bringing your project to life by building the frontend. Subscribe to stay updated 🔔!

